irst of all we will learn how to setup VisualVM in eclipse in windows platform.
Step 1) First we are going to download VisualVM Launcher(Eclipse 3.6+) depending on your eclipse version , extract downloaded zip file.
Click on Help > Install new software

Step 2) Click on Add...
Then click on Local…
Select location of extracted zip files (done in step 1).

Step 3) Give name = “visualvm_launcher” or you may name it whatever you may like.
Click Ok.

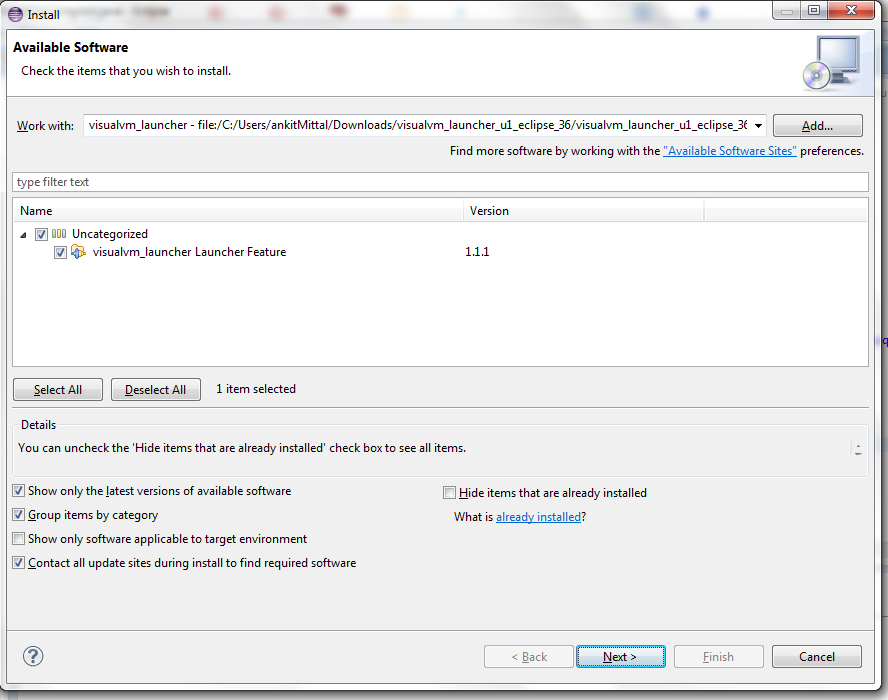
Step 4) Now, you will see this kind of wizard, check visualvm_launcher Launcher Feature
then click Next >
Follow the instruction, it will ask you restart eclipse.
Step 5)
Software will start getting installed, wait for few moments, it may take up to 10 minutes.

Now our visualVm Launcher is installed and ready to use.
Now, we are left with only bit of configuration work.
step 6) Go to windows > Preference > type VisualVM
Select visualVM executable location
Select Jdk available on your system.

Step 7) Right click on class which you want to run visualVm Launcher

Step 8) Now multiple launchers are available to us , click on Select one...

Check Use configuration specific setting
Select ViusalVM Launcher
Click Ok.
Run button will become Active, and click on Run

Now, comes the most important and interesting section - Creating Thread Dump using VisualVM and analyzing them.
Step 9) Here we have used the Deadlock Program.
After clicking Run, Java VisualVM will be launched in another window automatically from eclipse.
Java VisualVM will be launched and there you can see system saying DeadLock detected.

Step 10)
Further, we can click Thread Dump button to analyze logs >


No comments:
Post a Comment