Tuesday, October 25, 2022

VisualVM - Thread dumps - Generating and analyzing Thread Dumps using VisualVM - step by step detail to setup VisualVM with screenshots in java

 irst of all we will learn how to setup VisualVM in eclipse in windows platform.


Step 1) First we are going to download VisualVM Launcher(Eclipse 3.6+) depending on your eclipse version , extract downloaded zip file.

Click on Help > Install new software


Step 2)  Click on Add...
Then click on Local…
Select location of extracted zip files (done in step 1).


Step 3) Give name = “visualvm_launcher” or you may name it whatever you may like.
Click Ok.


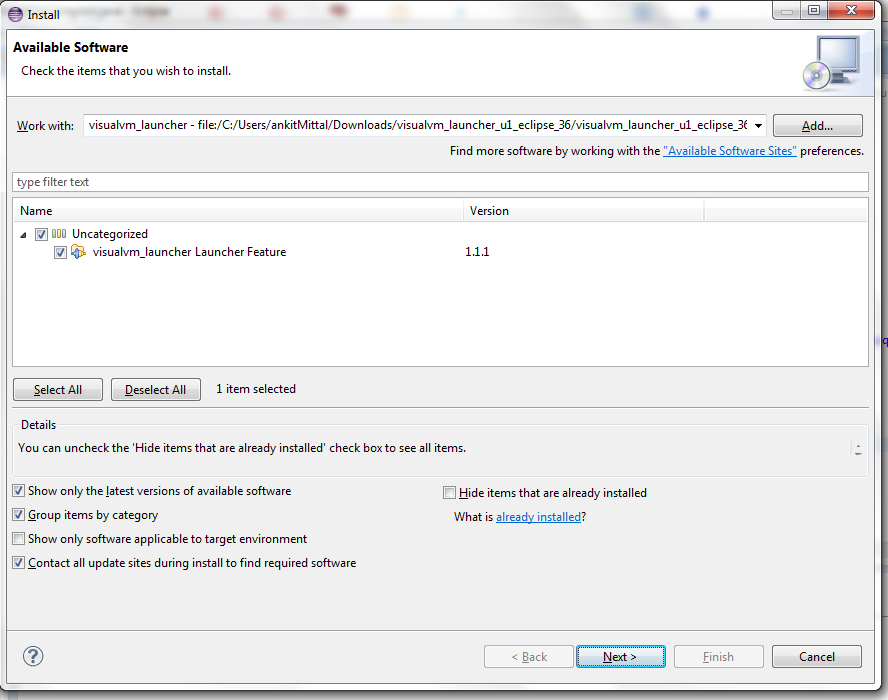
Step 4)  Now, you will see this kind of wizard, check visualvm_launcher Launcher Feature
then click Next >  
Follow the instruction, it will ask you restart eclipse.

Step 5)
Software will start getting installed, wait for few moments, it may take up to 10 minutes.

Now our visualVm Launcher is installed and ready to use.


Now, we are left with only bit of configuration work.

step 6) Go to windows > Preference > type VisualVM
Select visualVM executable location
Select Jdk available on your system.


Step 7) Right click on class which you want to run visualVm Launcher

Step 8) Now multiple launchers are available to us , click on Select one...

Check Use configuration specific setting
Select ViusalVM Launcher
Click Ok.
Run button will become Active, and click on Run


Now, comes the most important and interesting section - Creating Thread Dump using VisualVM and analyzing them.


Step 9) Here we have used the Deadlock Program.

After clicking Run, Java VisualVM will be launched in another window automatically from eclipse.
Java VisualVM will be launched and there you can see system saying DeadLock detected.


Step 10)
Further, we can click Thread Dump button to analyze logs >

Eclipse - WAR file creation


Click here to watch in Youtube : https://www.youtube.com/watch?v=fk22hQz9L_M

Click the below Image to Enlarge
Eclipse - WAR file creation


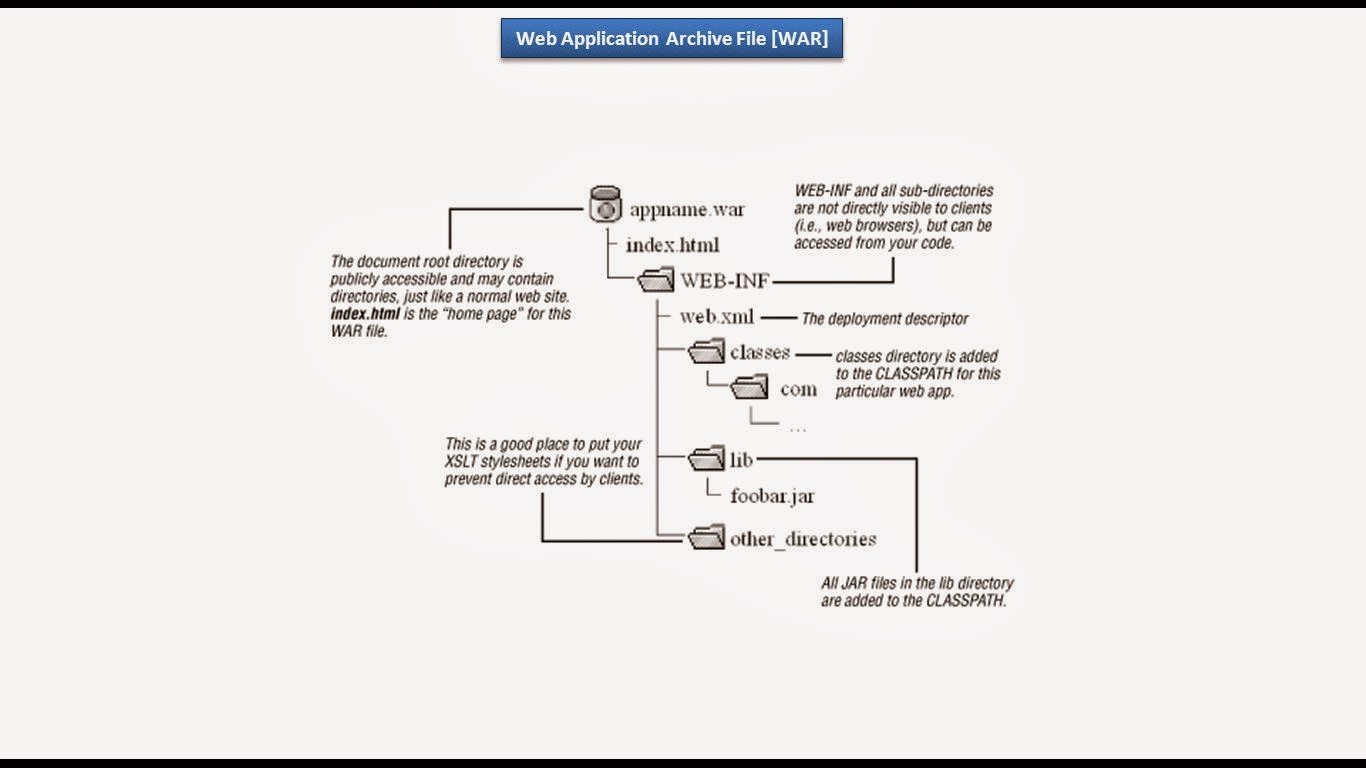
Web Application Archive File [WAR file]

 https://ramj2ee.blogspot.com/2014/03/web-application-archive-file-war-file.html


Web Application Archive File [WAR file]


Click here to watch in Youtube : https://www.youtube.com/watch?v=Trd4AACpBsQ

Click the below Image to Enlarge
Web Application Archive File [WAR file]

Create war file - JAR tool


Click here to watch in Youtube :  https://www.youtube.com/watch?v=FAxLj2gVHuM

Click the below Image to Enlarge
Create war file - JAR tool

Create war file - JAR tool
https://ramj2ee.blogspot.com/2014/03/create-war-file-jar-tool.html


Tuesday, October 4, 2022

Practice Set on Java Package

- Create three classes Add, Sub, Mul and Calculator  into a package 

- Use a build-in package in java to write a class which displays a message ( by using sout ) after taking input from the user 

- Create a package in class with four package levels folder p1 , folder p2 , folder p3 & p5 with their respected method sum(), diff(), pro() and call all method into class Calculator.

..

Add.java

  1. package p1;  
  2. import java.util.*;  
  3. public class Add  
  4. {  
  5. int s;  
  6. public void sum()  
  7. {  
  8. System.out.print("Enter the first number: ");  
  9. Scanner scan=new Scanner(System.in);  
  10. int x=scan.nextInt();  
  11. System.out.print("Enter the second number: ");  
  12. Scanner scan1=new Scanner(System.in);  
  13. int y=scan1.nextInt();  
  14. s=x+y;  
  15. System.out.println("sum="+s);  
  16. }  
  17. }  

Sub.java

  1. package p2;  
  2. import java.util.*;  
  3. public class Sub  
  4. {  
  5. int d;  
  6. public void diff()  
  7. {  
  8. System.out.print("Enter the first number: ");  
  9. Scanner scan=new Scanner(System.in);  
  10. int x=scan.nextInt();  
  11. System.out.print("Enter the second number: ");  
  12. Scanner scan1=new Scanner(System.in);  
  13. int y=scan1.nextInt();  
  14. d=x-y;  
  15. System.out.println("Difference="+d);  
  16. }  
  17. }  

Mult.java

  1. package p3;  
  2. import java.util.*;  
  3. public class Mult  
  4. {  
  5. int m;  
  6. public void pro()  
  7. {  
  8. System.out.print("Enter the first number: ");  
  9. Scanner scan=new Scanner(System.in);  
  10. int x=scan.nextInt();  
  11. System.out.print("Enter the second number: ");  
  12. Scanner scan1=new Scanner(System.in);  
  13. int y=scan1.nextInt();  
  14. m=x*y;  
  15. System.out.println("Product="+m);  
  16. }  
  17. }  

Now, we are going to create the main class named Calculator. In this class, we have imported all the packages that we have created above. It includes all the classes in the Calculator class.

Calculator.java

  1. package p5;  
  2. //importing pre-defined package  
  3. import java.util.*;  
  4. //importing user-defined package  
  5. import p1.Add;  
  6. import p2.Sub;  
  7. import p3.Mult;  
  8. import p4.Div;  
  9. public class Calculator  
  10. {  
  11. public static void main(String args[])  
  12. {  
  13. System.out.print("Enter your choice: ");  
  14. Scanner scan=new Scanner(System.in);  
  15. int t=scan.nextInt();  
  16. switch(t)  
  17. {  
  18. case 1:  
  19. Add a=new Add();  
  20. a.sum();  
  21. break;  
  22. case 2:  
  23. Sub s=new Sub();  
  24. s.diff();  
  25. break;  
  26. case 3:  
  27. Mult m=new Mult();  
  28. m.pro();  
  29. break;  
  30. case 4:  
  31. Div d=new Div();  
  32. d.divd();  
  33. break;  
  34. }  
  35. }  
  36. }  

When we compile the above program, it creates corresponding .class files in packages named p1, p2, p3 and p5, respectively.

The .class files are generated. Now, we can run the above program.

Output:

Enter your choice: 3
Enter the first number: 2
Enter the second number: 23	
Product=46

..


techguruspeaks

  Core Java programming Introduction to Java Java Features Writing a Simple Java Program Java Keywords and Comments Variables, Identifiers ...